KL, MY
7:30:00 AM
KL, MY
7:30:00 AM

Enable Hyper-V on Windows to run Docker Desktop and other virtualization tools.
May 6, 2025
4 min read
Hyper-V is a virtualization technology integrated directly into Windows, allowing you to run virtual machines (VMs). Notably, Windows Subsystem for Linux 2 (WSL2) leverages Hyper-V to provide a lightweight environment for running Linux distributions. If you plan to use Docker Desktop or other virtualization software on your Windows system, enabling Hyper-V is a necessary first step.
Before going into Windows settings, you need to ensure that hardware virtualization is enabled within your computer’s BIOS or UEFI firmware. The name for this setting varies depending on the manufacturer, but common terms include:
Reboot your computer and enter the BIOS/UEFI settings (usually by pressing F2, F10, Delete, or Esc during startup). Look for the virtualization option and make sure it is enabled. Save your changes and exit.
Once virtualization is enabled in your BIOS/UEFI, follow these steps to enable Hyper-V within Windows:
Open “Turn Windows features on or off”:
Enable Hyper-V Features:
In the “Windows Features” dialog box, locate and check the boxes next to the following:
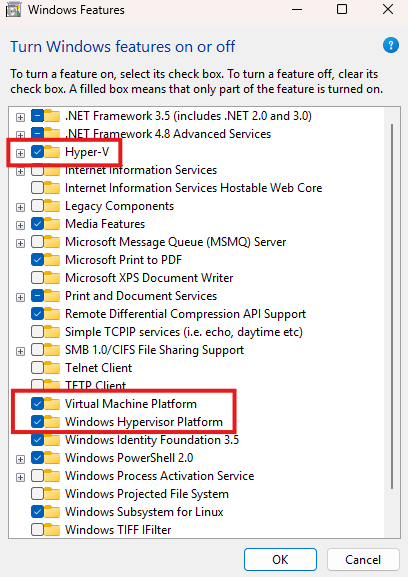

Click OK and restart your computer if prompted.
Open PowerShell as Administrator and run the following command to check if Hyper-V is enabled:
Get-WindowsOptionalFeature -Online -FeatureName Microsoft-Hyper-V-AllIf Hyper-V is enabled, you should see the following output:
FeatureName : Microsoft-Hyper-V-All DisplayName : Hyper-V Description : Provides services and management tools for creating and running virtual machines and their resources. RestartRequired : Possible State : Enabled CustomProperties :If Hyper-V is not enabled, you can enable it by running the following command:
Using PowerShell (as Administrator):
Enable-WindowsOptionalFeature -Online -FeatureName Microsoft-Hyper-V -AllUsing DISM (Deployment Image Servicing and Management):
If the PowerShell command returns an error (e.g., 0x800f0831), try this command in an elevated Command Prompt (run as Administrator):
DISM /Online /Enable-Feature /All /FeatureName:Microsoft-Hyper-VUsing a .bat Script (as Administrator):
If the above methods fail, you can try this script. Create a new text file, paste the following content into it, save it with a .bat extension (e.g., enable_hyperv.bat), and then run it as Administrator:
pushd "%~dp0"dir /b %SystemRoot%\servicing\Packages\*Hyper-V*.mum >hv-home.txtfor /f %%i in ('findstr /i . hv-home.txt 2^>nul') do dism /online /norestart /add-package:"%SystemRoot%\servicing\Packages\%%i"del hv-home.txtDism /online /enable-feature /featurename:Microsoft-Hyper-V -All /LimitAccess /ALLpauseThis script searches for the Hyper-V packages in the Windows servicing directory and adds them to the system. The pause command at the end allows you to see any error messages before the window closes. (source)
After enabling Hyper-V, restart your computer.
Open PowerShell as Administrator and make sure Hyper-V is enabled:
Get-WindowsOptionalFeature -Online -FeatureName Microsoft-Hyper-V-AllYou should see the same output as before, confirming that Hyper-V is enabled.
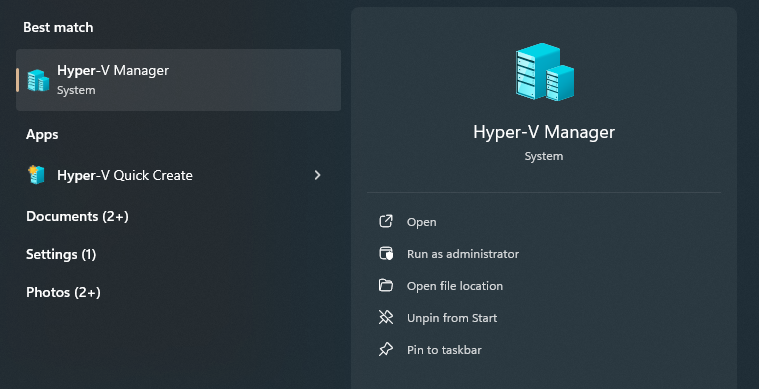
Search Hyper-V Manager in the Start menu and open it. You should see the Hyper-V Manager window, which indicates that Hyper-V is installed and running.

Now that you have enabled Hyper-V, you can use Docker Desktop and other virtualization tools on your Windows machine. If you encounter any issues, make sure to check your BIOS/UEFI settings and ensure that virtualization is enabled there as well.